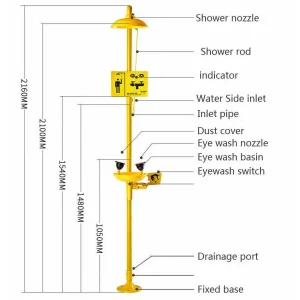
How to Install Emergency Shower and Eyewash
Emergency shower and eyewash stations are critical workplace safety equipment designed to provide immediate decontamination when workers are exposed to hazardous chemicals, corrosive substances, dust, or other harmful materials. Industries such as manufacturing, chemical processing, laboratories, oil and gas, pharmaceuticals, and food processing commonly install emergency showers and eyewash stations to comply with safety regulations and protect employees.
Proper installation is essential to ensure the equipment functions effectively during emergencies. This guide explains how to install emergency shower and eyewash stations correctly while meeting safety standards and workplace requirements.
Why Emergency Shower and Eyewash Stations Are Important
Chemical splashes and hazardous material exposure can cause severe injuries within seconds. An emergency shower or eyewash station allows workers to flush contaminants from their body, face, and eyes immediately, reducing the risk of long-term injury.
Benefits include:
- Rapid response to chemical exposure
- Reduced workplace injuries
- Compliance with occupational safety standards
- Improved employee safety awareness
- Protection against legal and regulatory penalties
In Malaysia, emergency showers and eyewash stations are commonly installed in factories, laboratories, warehouses, and industrial facilities where hazardous substances are handled.
Step 1: Conduct a Hazard Assessment
Before installing an emergency shower and eyewash station, perform a comprehensive workplace hazard assessment.
Consider the following:
- Types of chemicals used
- Chemical concentration levels
- Areas with splash risks
- Number of workers exposed
- Distance from hazardous processes
- Environmental conditions
The hazard assessment helps determine whether an eyewash station, emergency shower, or combination unit is required.
For workplaces handling corrosive chemicals, a combination emergency shower and eyewash station is typically recommended.
Step 2: Select the Appropriate Equipment
There are several types of emergency washing equipment available:
How to Install emergency shower and eyewash
Emergency Eyewash Stations
Designed to flush contaminants from the eyes and face.
Suitable for:
- Chemical laboratories
- Battery charging stations
- Chemical mixing areas
- Maintenance workshops
Emergency Safety Showers
Used when hazardous substances come into contact with the body.
Suitable for:
- Chemical processing plants
- Manufacturing facilities
- Industrial warehouses
Combination Shower and Eyewash Units
Provide full-body and eye decontamination simultaneously.
Recommended for areas with high chemical exposure risks.
When selecting equipment, ensure it complies with recognized safety standards such as ANSI/ISEA Z358.1.
Step 3: Choose the Correct Installation Location
Location is one of the most important factors in emergency shower installation.
The equipment should be:
- Accessible within 10 seconds of travel time
- Located on the same level as the hazard
- Free from obstructions
- Clearly visible
- Easily accessible during emergencies
Avoid installing emergency showers behind doors, machinery, storage racks, or other barriers.
Workers should be able to reach the station quickly without requiring assistance.
Location Requirements
The emergency shower and eyewash station should:
- Be near hazardous work areas
- Have adequate lighting
- Be clearly marked with safety signage
- Remain accessible at all times
Proper placement significantly improves emergency response effectiveness.
Step 4: Ensure Adequate Water Supply
A reliable water source is essential for proper operation.
The water supply should provide:
- Continuous flow
- Adequate pressure
- Sufficient volume
- Clean flushing water
According to ANSI guidelines:
Emergency Shower Requirements
- Minimum flow rate: 75.7 liters per minute
- Continuous flow for at least 15 minutes
Eyewash Station Requirements
- Minimum flow rate: 1.5 liters per minute
- Continuous flow for at least 15 minutes
The water temperature should be tepid, generally between 16°C and 38°C.
Water that is too hot or too cold may discourage users from flushing for the required duration.
Step 5: Install the Emergency Shower Unit
Once the location and water supply are prepared, proceed with installation.
Installation Process
1. Prepare the Mounting Area
Ensure the floor is level and strong enough to support the equipment.
For wall-mounted units:
- Verify wall strength
- Use appropriate anchors and fasteners
For floor-mounted units:
- Secure the base firmly to the floor
2. Connect Water Supply Lines
Install supply piping according to manufacturer specifications.
Use:
- Corrosion-resistant piping
- Suitable fittings
- Isolation valves for maintenance
Avoid reducing water flow through undersized piping.
3. Install the Shower Head
Position the shower head according to manufacturer guidelines.
The spray pattern should fully cover the user’s body for effective decontamination.
4. Install Pull Rod or Activation Handle
The activation mechanism should be:
- Easy to locate
- Operable within one second
- Usable without requiring both hands
Workers must be able to activate the shower immediately during emergencies.
Step 6: Install the Eyewash Station
For eyewash station installation:
Positioning Requirements
The eyewash nozzles should be installed at a comfortable height for users.
The unit should provide:
- Simultaneous flushing of both eyes
- Hands-free operation after activation
- Gentle, non-injurious water flow
Installation Steps
- Mount the unit securely.
- Connect water supply lines.
- Install protective nozzle covers.
- Verify proper water pressure.
- Test water flow patterns.
Ensure no sharp edges or obstructions interfere with use.
Step 7: Install Safety Signage
Emergency equipment must be easily identifiable.
Install:
- Emergency shower signs
- Eyewash station signs
- Directional safety signs
Signs should be:
- Highly visible
- Illuminated if necessary
- Positioned above the equipment
Workers should be able to locate the station quickly, even during stressful emergency situations.
Step 8: Test and Commission the System
Before placing the equipment into service, conduct a full operational test.
Verify:
- Water flow rates
- Activation mechanisms
- Drainage performance
- Spray patterns
- Water temperature
Document all testing results.
Correct any issues before the equipment becomes operational.
Step 9: Establish Inspection and Maintenance Procedures
Installation is only the beginning.
Regular inspections help ensure emergency showers and eyewash stations remain functional.
Weekly Inspections
Check:
- Water flow
- Obstructions
- Leaks
- Activation handles
- Nozzle cleanliness
Annual Inspections
Conduct comprehensive testing to verify compliance with safety standards.
Inspect:
- Water pressure
- Flow rates
- Equipment condition
- Signage visibility
Proper maintenance ensures the system performs effectively when needed most.
Common Installation Mistakes to Avoid
Many facilities make mistakes that reduce emergency shower effectiveness.
Avoid:
- Installing units too far from hazards
- Blocking access pathways
- Using inadequate water pressure
- Ignoring temperature requirements
- Failing to perform regular inspections
- Installing without proper hazard assessment
These mistakes can delay emergency response and increase injury severity.